
Want to bring widgets to your SwiftUI app but not sure where to begin? This…
How to Build a SwiftUI Widget with App Intents and SwiftData ( Configurable Widget )
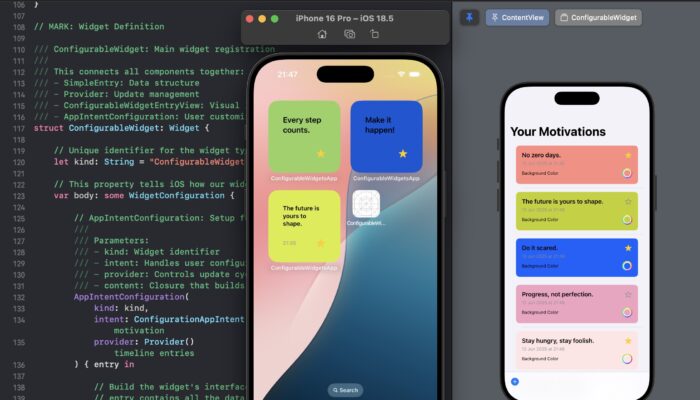
In this comprehensive tutorial, we’ll guide you through the process of constructing a fully functional Configurable Widget utilizing the latest SwiftUI technologies. This widget will empower users to select content from your app, such as a motivational quote, and display it conveniently on their Home Screen. Additionally, users will have the option to select a background color and toggle the Favorite state for the widget.
📦 Download the Code for this Tutorial 📥
🛠 Step 1: Project Setup
1. Create the Base App
- Open Xcode, navigate to File, select New, and choose Project. Set the name to ConfigurableWidgetsApp. For the Interface, select SwiftUI, and for the Language, select Swift.
2. Add a Widget Extension
- Go to File → New → Target → Select Widget Extension. Uncheck Live Activity and Control, and check Include Configuration App Intent. Name it ConfigurableWidget. If prompted, activate the ConfigurableWidgetExtension scheme.
3. Enable App Groups
We utilize App Groups to facilitate data sharing between your app and widget. To proceed, navigate to your app target, select Signing & Capabilities, and then click on Add App Groups. Next, create a new App Group with the name group.com.yourname.ConfigurableWidgets. Repeat the same process for your widget target. It’s crucial to ensure that both appGroups share the same group container name to enable data sharing between your app and widget.
🧱 Step 2: Create the SwiftData Model
Inside your app, create a file Motivation.swift.
This SwiftData model represents a single motivational message.
Model
final class Motivation: Identifiable {

    var id: UUID?
    var message: String?
    var timestamp: Date?

    init(message: String?, timestamp: Date = .now) {
        self.id = UUID()
        self.message = message
        self.timestamp = timestamp
    }
}
To ensure that your file is accessible within your WidgetExtension, you must attach the “Motivation.swift” file to the Target. This process applies to any file you intend to use within your extension.
Register the model in your app
Open ConfigurableWidgetsApp.swift and configure the model container with .modelContainer(for: [Motivation.self]) Don’t forget to add import SwiftData
import SwiftData

@main
struct ConfigurableWidgetsApp: App {
    var body: some Scene {
        WindowGroup {
            ContentView()
        }
        .modelContainer(for: [Motivation.self])
    }
}
This sets up your SwiftData model and prepares it for storage and syncing.
📲 Step 3: Build the Motivation List UI
Now, let’s construct the user interface that enables you to manage your list of motivations within the app.
We’ll create or update ContentView.swift to implement these features.
import SwiftUI
import SwiftData

struct ContentView: View {

    @Environment(\.modelContext) private var modelContext
    @Query(sort: \Motivation.timestamp, order: .reverse) private var motivations: [Motivation]

    @State private var showAllUsedAlert = false

    let motivationSamples = [
        "Keep going!",
        "You got this!",
        "Make it happen!",
        "Dream big, act bigger.",
        "Stay hungry, stay foolish.",
        "Progress, not perfection.",
        "Push beyond limits.",
        "Your only limit is you.",
        "Success is a habit.",
        "Discipline > Motivation.",
        "Every step counts.",
        "Don’t stop now.",
        "You were made for more.",
        "Do it scared.",
        "Tiny wins every day.",
        "No zero days.",
        "Trust the process.",
        "The future is yours to shape.",
        "Create your own momentum.",
        "Consistency is your superpower."
    ]

    var body: some View {
            NavigationStack {
                List {
                    ForEach(motivations) { motivation in
                        VStack(alignment: .leading) {
                            Text(motivation.message ?? "No message")
                                .font(.headline)
                            if let timestamp = motivation.timestamp {
                                Text(timestamp.formatted(date: .abbreviated, time: .shortened))
                                    .font(.caption)
                                    .foregroundStyle(.gray)
                            }
                        }
                        .padding(.vertical, 4)
                    }
                    .onDelete(perform: deleteItems)
                }
                .navigationTitle("Your Motivations")
                .toolbar {
                    ToolbarItem(placement: .bottomBar) {
                        Button(action: addItem) {
                            Label("Add Motivation", systemImage: "plus.circle.fill")
                                .font(.headline)
                        }
                    }
                }
                .alert("All Motivations Added", isPresented: $showAllUsedAlert) {
                    Button("OK", role: .cancel) {}
                } message: {
                    Text("You've already added all available motivation samples.")
                }
            }
        }

    private func addItem() {

        // Check which messages are not yet in the list
        let existingMessages = Set(motivations.compactMap { $0.message })
        let availableMessages = motivationSamples.filter { !existingMessages.contains($0) }

        // If no new messages left, show alert
        guard let newMessage = availableMessages.randomElement() else {
            showAllUsedAlert = true
            return
        }

        let newMotivation = Motivation(message: newMessage)
        modelContext.insert(newMotivation)
        try? modelContext.save()

    }

    private func deleteItems(at offsets: IndexSet) {

        for index in offsets {
            let item = motivations[index]
            modelContext.delete(item)
            try? modelContext.save()
        }

    }

}
🧠 Step 4: Let Users Choose a Motivation in the Widget Configuration Panel
Widgets powered by AppIntentConfiguration can display dynamic content that users can choose from, such as motivational quotes from your SwiftData model. To achieve this, we need to ensure that our SwiftData model (Motivation) is compatible with the widget configuration UI.
AppEntity and EntityQuery play a crucial role in this process.
4.1. Define an AppEntity Wrapper: MotivationEntity
Inside AppIntent.swift, add this struct:
struct MotivationEntity: AppEntity {
    var id: String
    var message: String

    static var typeDisplayRepresentation: TypeDisplayRepresentation = "Motivation"
    static var defaultQuery = MotivationQuery()

    var displayRepresentation: DisplayRepresentation {
        DisplayRepresentation(
            title: LocalizedStringResource("\(message)"),
            subtitle: LocalizedStringResource("\(id)")
        )
    }
}
4.2. Add a Query to Load Motivations from SwiftData
Still in AppIntent.swift, define the following below MotivationEntity:
struct MotivationQuery: EntityQuery {

    func suggestedEntities() async throws -> [MotivationEntity] {
        return try await fetchMotivations()
    }

    func defaultResult() async -> MotivationEntity? {
        return try? await fetchMotivations().first
    }

    func entities(for identifiers: [String]) async throws -> [MotivationEntity] {
        let motivations = try await fetchMotivations()
        return motivations.filter { identifiers.contains($0.id) }
    }

    private func fetchMotivations() async throws -> [MotivationEntity] {
        let container = try ModelContainer(for: Motivation.self)
        let context = ModelContext(container)
        let results = try context.fetch(FetchDescriptor<Motivation>())

        return results.compactMap {
            guard let id = $0.id?.uuidString, let message = $0.message else { return nil }
            return MotivationEntity(id: id, message: message)
        }
    }
}
4.3. Update the Intent Itself
Finally, let’s replace the default emoji parameter with our motivation selection.
struct ConfigurationAppIntent: WidgetConfigurationIntent {

    static var title: LocalizedStringResource = "Choose Motivation"
    static var description = IntentDescription("Pick a motivation message to show in your widget.")

    @Parameter(title: "Motivation")
    var motivation: MotivationEntity?

}
Now, when users long-press your widget and tap “Edit,” they’ll see a dropdown list of motivational quotes directly pulled from your app’s database. However, to test this feature, we need to make some adjustments in our Configurable Widget to align with our new Intent.
Step 5: Update the Widget Provider to Display Selected Motivation
Users can now select a motivational message in the widget’s configuration screen using ConfigurationAppIntent. To display their selection, we need to update the actual widget logic in ConfigurableWidget.swift.
Step 5.1: Update TimelineEntry
SimpleEntry: TimelineEntry is a struct — the data model for a widget at a specific point in time.
struct SimpleEntry: TimelineEntry {
    let date: Date
    let configuration: ConfigurationAppIntent
}
Step 5.2: Update AppIntentTimelineProvider
This is your AppIntentTimelineProvider, which is responsible for creating placeholder, snapshot, and timeline entries. It serves as the central component of your widget, determining what content to display and when to display it to WidgetKit.
struct Provider: AppIntentTimelineProvider {

... }
func placeholder(in context: Context) -> SimpleEntry {
    SimpleEntry(date: .now, configuration: ConfigurationAppIntent())
}
func snapshot(for configuration: ConfigurationAppIntent, in context: Context) async -> SimpleEntry {
    SimpleEntry(date: .now, configuration: configuration)
}
func timeline(for configuration: ConfigurationAppIntent, in context: Context) async -> Timeline<SimpleEntry> {
    let entry = SimpleEntry(date: .now, configuration: configuration)
    return Timeline(entries: [entry], policy: .never)
}
🖼 Step 6: Design the Widget View
Now that your timeline provider is ready, let’s enhance the widget’s visual appeal. Our objective is to present the user-selected motivational quote in a clean and visually appealing layout.
6.1 Update ConfigurableWidgetEntryView
We’ll update the widget view to display:
- A motivational message (from
entry.configuration.motivation.message) - A timestamp for when the widget was last refreshed (optional but helpful for debugging or dynamic updates later)
/// The actual content shown in the widget on the Home Screen
struct ConfigurableWidgetEntryView: View {

    var entry: Provider.Entry

    var body: some View {
        ZStack {

            VStack(alignment: .leading, spacing: 8) {
                // Main motivation text
                Text(entry.configuration.motivation?.message ?? "Test")
                    .font(.headline)
                    .lineLimit(3)
                    .minimumScaleFactor(0.5)
                    .bold()
                    .multilineTextAlignment(.leading)

                Spacer()

                // Optional timestamp (can remove in production)
                Text(entry.date, style: .time)
                    .font(.caption2)
                    .foregroundStyle(.gray)
            }
            .padding()
        }
    }

}
6.2 ConfigurableWidget Definition — Widget
ConfigurableWidget struct registers your widget with the system, connecting your Provider, ConfigurableWidgetEntryView, and ConfigurationAppIntent.
struct ConfigurableWidget: Widget {

    let kind: String = "ConfigurableWidget"

    var body: some WidgetConfiguration {
        AppIntentConfiguration(
            kind: kind,
            intent: ConfigurationAppIntent.self,
            provider: Provider()
        ) { entry in
            ConfigurableWidgetEntryView(entry: entry)
                .containerBackground(Color(.systemBackground), for: .widget)
        }
    }

}
6.3 Widget Preview With Motivation Entities
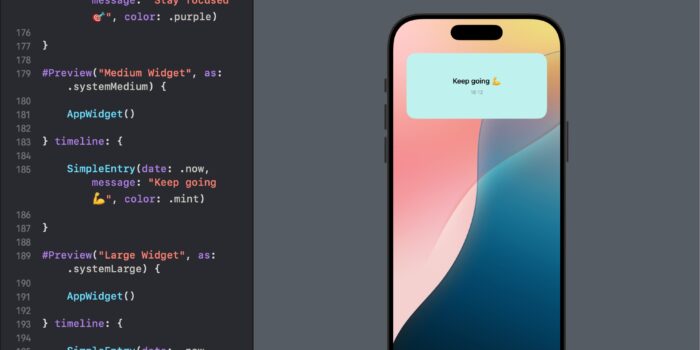
Update the widget preview block to use the sample motivations:
#Preview(as: .systemSmall) {
    ConfigurableWidget()
} timeline: {
    SimpleEntry(date: .now, configuration: .sampleMotivation1)
    SimpleEntry(date: .now, configuration: .sampleMotivation2)
}
extension ConfigurationAppIntent {

    /// Sample configuration using a fake MotivationEntity
    fileprivate static var sampleMotivation1: ConfigurationAppIntent {
        let intent = ConfigurationAppIntent()
        intent.motivation = MotivationEntity(
            id: UUID().uuidString,
            message: "Push beyond limits."
        )
        return intent
    }

    fileprivate static var sampleMotivation2: ConfigurationAppIntent {
        let intent = ConfigurationAppIntent()
        intent.motivation = MotivationEntity(
            id: UUID().uuidString,
            message: "The future is yours to shape."
        )
        return intent
    }
}
Step 7: Test the Widget in Simulator (and Improve Selection UI)
Before we refine the widget configuration UI, test your widget setup in the Simulator to ensure everything functions correctly.
🔍 How to Test in Simulator
- Run your app first to populate SwiftData with some motivations.
- Long-press the Home Screen in the Simulator.
- Tap “+” (Add Widget) → choose your widget → Add to Home Screen.
- Tap and hold the widget, choose Edit, and you’ll see the motivational message dropdown.
Right now, the widget configuration uses the default dropdown UI, which works well, but it becomes cumbersome and difficult to search when you have numerous motivation entries.
To address this issue, we aim to enhance the configuration panel by implementing the following changes:
– Displaying motivations in a popup list.
– Enabling a search bar.
Step 8: Enable Searchable Picker for MotivationEntity
To enable a searchable experience within the widget configuration, we must update the MotivationQuery to support live filtering.
Firstly, ensure that your query struct adheres to the EntityStringQuery protocol, not just the EntityQuery protocol. Modify the declaration accordingly:
struct MotivationQuery: EntityStringQuery {
Then, implement the required entities(matching:) method to support real-time search:
    func entities(matching string: String) async throws -> [MotivationEntity] {
          let motivations = try await fetchMotivations()
          return motivations.filter {
              $0.message.localizedCaseInsensitiveContains(string)
          }
      }
Rebuild the app, run it in the simulator or on a physical device, and edit your widget. As you type in the Motivation field, the results should now appear in real time.
🎨 Step 9: Add Custom Background Color and Favorite Toggle
To make your widget more personalized, let’s give users control over the following:
– Custom background color (stored in SwiftData)
– Marking a motivation as a favorite
9.1: Update the SwiftData Model
Open Motivation.swift and update the model:
@Model
final class Motivation: Identifiable {

    var id: String?
    var message: String?
    var timestamp: Date?

    var isFavorite: Bool?
    var backgroundColorHex: String?

    init(message: String?, timestamp: Date = .now, isFavorite: Bool = false, backgroundColorHex: String? = nil) {

        self.id = UUID().uuidString
        self.message = message
        self.timestamp = timestamp
        self.isFavorite = isFavorite
        self.backgroundColorHex = backgroundColorHex

    }

}
9.2 Update the MotivationEntity: AppEntity Wrapper
Since the widget relies on MotivationEntity, we’ll add these fields to pass to the widget:
struct MotivationEntity: AppEntity {

    var id: String
    var message: String
    var isFavorite: Bool
    var backgroundColorHex: String?

    static var typeDisplayRepresentation: TypeDisplayRepresentation = "Motivation"

    static var defaultQuery = MotivationQuery()

    var displayRepresentation: DisplayRepresentation {
        DisplayRepresentation(
            title: LocalizedStringResource("\(message)"),
            subtitle: LocalizedStringResource(isFavorite ? "⭐️ \(id)" : "\(id)")
        )
    }
}
9.3: Update fetchMotivations() Logic
In MotivationQuery, update the conversion method to include the new properties:
        return results.compactMap {
               guard let id = $0.id, let message = $0.message else { return nil }
               return MotivationEntity(
                   id: id,
                   message: message,
                   isFavorite: $0.isFavorite ?? false,
                   backgroundColorHex: $0.backgroundColorHex
               )
           }
9.4 Update Preview Samples for Widget Testing
To test your widget with styled previews, update your .sampleMotivation1 and .sampleMotivation2 values:
extension ConfigurationAppIntent {

    /// Preview: Configuration with sample motivation 1
    fileprivate static var sampleMotivation1: ConfigurationAppIntent {
        let intent = ConfigurationAppIntent()
        intent.motivation = MotivationEntity(
            id: UUID().uuidString,
            message: "Push beyond limits.", isFavorite: true, backgroundColorHex: "#D3D3D3"
        )
        return intent
    }

    /// Preview: Configuration with sample motivation 2
    fileprivate static var sampleMotivation2: ConfigurationAppIntent {
        let intent = ConfigurationAppIntent()
        intent.motivation = MotivationEntity(
            id: UUID().uuidString,
            message: "The future is yours to shape.", isFavorite: false, backgroundColorHex: "#FFFFFF"
        )
        return intent
    }
}
9.5 Update the Widget View
Check the isFavorite flag to display a star
struct ConfigurableWidgetEntryView: View {

    var entry: Provider.Entry

    var body: some View {
        ZStack {
            VStack(alignment: .leading, spacing: 8) {

                // Motivation message text (user-selected)
                Text(entry.configuration.motivation?.message ?? "Stay motivated!")
                    .font(.headline)
                    .lineLimit(3)
                    .minimumScaleFactor(0.5)
                    .bold()
                    .multilineTextAlignment(.leading)

                Spacer()

                HStack {

                    // Timestamp (optional: shows when widget was last updated)
                    Text(entry.date, style: .time)
                        .font(.caption2)
                        .foregroundStyle(.gray)

                    Spacer()

                    if entry.configuration.motivation?.isFavorite == true {
                                     Text("⭐️")
                                         .font(.caption)
                                         .foregroundStyle(.yellow)
                                 }

                }
            }
            .padding()
        }
    }
}
Create a new Helpers.swift file and add a Color extension to it, allowing you to create a Color from a String. Remember to check the Widget target for this file to ensure it’s visible within the Widgets Extension.
extension Color {
    init(hex: String) {
        let hex = hex.trimmingCharacters(in: CharacterSet.alphanumerics.inverted)
        var int = UInt64()
        Scanner(string: hex).scanHexInt64(&int)

        let r, g, b: UInt64
        switch hex.count {
        case 6: // RGB (24-bit)
            (r, g, b) = ((int >> 16) & 0xFF, (int >> 8) & 0xFF, int & 0xFF)
        default:
            (r, g, b) = (255, 255, 255)
        }

        self.init(.sRGB, red: Double(r) / 255, green: Double(g) / 255, blue: Double(b) / 255)
    }
}
Next, let’s make sure our widget uses the entity background
struct ConfigurableWidget: Widget {

    // Unique identifier for this widget
    let kind: String = "ConfigurableWidget"

    var body: some WidgetConfiguration {
        AppIntentConfiguration(
            kind: kind,
            intent: ConfigurationAppIntent.self,  // Our custom intent with motivation
            provider: Provider()                  // The logic that supplies timeline entries
        ) { entry in
            ConfigurableWidgetEntryView(entry: entry)
                .containerBackground(Color(hex: entry.configuration.motivation?.backgroundColorHex ?? "#D3D3D3"), for: .widget)
        }
    }
}
🧭 Step 10: Display Favorites and Background Color in the Main App
🔧 10.1 Update the List Row in ContentView.swift
Replace the VStack for each motivation in your ForEach block with this:
 ZStack {
                            if let hex = motivation.backgroundColorHex {
                                Color(hex: hex)                                    .cornerRadius(8)
                            }

                                HStack {

                                    VStack(alignment: .leading, spacing: 8) {

                                        Text(motivation.message ?? "No message")
                                            .font(.headline)
                                            .foregroundStyle(.primary)

                                        if let timestamp = motivation.timestamp {
                                            Text(timestamp.formatted(date: .abbreviated, time: .shortened))
                                                .font(.caption)
                                                .foregroundStyle(.gray)
                                        }

                                    }

                                    Spacer()

                                    if motivation.isFavorite == true {
                                        Spacer()
                                        Text("⭐️")
                                            .foregroundStyle(.yellow)
                                            .font(.headline)
                                    }
                                }
                                .background(Color(hex: motivation.backgroundColorHex ?? "F1F1F1"))


                            .padding(20)
                        }
                        .listRowInsets(EdgeInsets())
                        .listRowBackground(Color.clear)
Step 11: Add Background Color Picker to Each Row
We’ll do 3 things:
- Move the full row UI into a reusable
MotivationRowView. - Show a
ColorPickerinline inside each row. - Save the picked color as a hex string to SwiftData.
🔧 11.1 Create a Row View
In a new file (or below ContentView), create this:
struct MotivationRowView: View {
    @Bindable var motivation: Motivation
    @Environment(\.modelContext) private var modelContext

    var body: some View {
        VStack(alignment: .leading, spacing: 6) {
            HStack {
                Text(motivation.message ?? "No message")
                    .font(.headline)
                    .foregroundStyle(.primary)
                    .lineLimit(2)

                if motivation.isFavorite == true {
                    Spacer()
                    Text("⭐️")
                        .foregroundStyle(.yellow)
                }
            }

            if let timestamp = motivation.timestamp {
                Text(timestamp.formatted(date: .abbreviated, time: .shortened))
                    .font(.caption)
                    .foregroundStyle(.gray)
            }

            // Inline Color Picker
            ColorPicker(motivation.backgroundColorHex ?? "#FFFFFF", selection: Binding(
                get: {
                    Color(hex: motivation.backgroundColorHex ?? "#FFFFFF")
                },
                set: { newColor in
                    motivation.backgroundColorHex = newColor.toHex()
                    try? modelContext.save()
                }
            ))
            .font(.caption)
        }
        .padding()
        .background(
            Color(hex: motivation.backgroundColorHex ?? "#F2F2F7")
                .cornerRadius(10)
        )
    }
}
📦 11.2 Update ContentView.swift
Replace your ForEach block with this:
ForEach($motivations) { $motivation in
     MotivationRowView(motivation: motivation)
                        .listRowBackground(Color.clear)
}
.onDelete(perform: deleteItems)
🧩 11.3 Add Color.toHex() Extension
In Helpers.swift (shared with widget), add:
   func toHex() -> String {
        let uiColor = UIColor(self)
        var r: CGFloat = 0, g: CGFloat = 0, b: CGFloat = 0, a: CGFloat = 0
        uiColor.getRed(&r, green: &g, blue: &b, alpha: &a)
        return String(format: "#%02X%02X%02X", Int(r * 255), Int(g * 255), Int(b * 255))
    }
Step 12: Test it and force Updates
Delete the app, create 4 new Motivations and set colors to Yellow, Green, Red, Blue inside the app. After that create 4 widgets for these 4 motivations. Works great right.
Manually Reload the Widget Timeline
- Tell WidgetKit to reload the timeline of our widget whenever a Motivation is updated.
- Trigger this in a clean and efficient way inside SwiftUI, every time a user picks a new color (or you update any field).
🛠 Trigger Timeline Reload on Color Change
Update the ColorPicker binding’s setter:
ColorPicker("Background Color", selection: Binding(
    get: {
        Color(hex: motivation.backgroundColorHex ?? "#FFFFFF")
    },
    set: { newColor in
        motivation.backgroundColorHex = newColor.toHex()
        try? modelContext.save()

        // Reload widget
        WidgetCenter.shared.reloadAllTimelines()
    }
))
.font(.caption)
Repeat this pattern for any other motivation updates that will appear in the future
🔄 Optional: Refresh on App Become Active
You can also call: WidgetCenter.shared.reloadAllTimelines()inside onChange(of: scenePhase) in your App :
.onChange(of: scenePhase) { oldPhase, newPhase in

            if newPhase == .background {

                // Optional
                WidgetCenter.shared.reloadAllTimelines()
            }

        }
If your app becomes more complex, consider calling: WidgetCenter.shared.reloadTimelines(ofKind: “ConfigurableWidget”) instead of .reloadAllTimelines() to avoid refreshing other widgets unnecessarily.
⭐️ Step 13: Make the “Favorite” Toggle Configurable from the Widget
Let’s take your configurable widget to the next level by enabling users to toggle the “Favorite” status directly from the widget itself. This feature synchronizes the change with your SwiftData model shared with the main app, providing powerful bidirectional control and enhancing the user experience.
Previously, widget configuration was limited to reading from SwiftData. Now, we’re introducing write-back capabilities. When a user taps the star button in the widget, it will toggle the favorite status and persist the change to SwiftData. Consequently, the app UI and the widget will automatically update with the changes.
🧱 13.1 Add a Shared SwiftData Container
To enable the widget extension to write to your SwiftData store, create a singleton container shared via App Group.
// MARK: - Shared Model Container
/// Singleton container for shared access across app and widget
class SharedModelContainer {

   static let shared = SharedModelContainer()

   let container: ModelContainer

   private init() {
       // Configure the container for shared access via App Group
       let schema = Schema([Motivation.self])
       let modelConfiguration = ModelConfiguration(schema: schema, groupContainer: .identifier("group.com.adelmaer.ConfigurableWidgetsApp"))

       do {
           container = try ModelContainer(for: schema, configurations: modelConfiguration)
       } catch {
           fatalError("Could not create ModelContainer: \(error)")
       }
   }
}
Next, within your main application add .modelContainer(SharedModelContainer.shared.container)
import SwiftUI
import SwiftData
import WidgetKit

@main
struct ConfigurableWidgetsAppApp: App {

    @Environment(\.scenePhase) private var scenePhase

    var body: some Scene {
        WindowGroup {
            ContentView()
        }
        .modelContainer(SharedModelContainer.shared.container)
        .onChange(of: scenePhase) { _, newPhase in
            if newPhase == .background {
                WidgetCenter.shared.reloadAllTimelines()
            }
        }
    }
}
This ensures both the app and widget share the same SwiftData storage, keeping everything in sync.
🧠 13.2 Create an AppIntent to Toggle Favorite
We’ll now create a standalone intent that, when the user taps the star icon in the widget, toggles the favorite status. This intent retrieves data from SwiftData using the shared model container, toggles the isFavorite field, and saves the result. AppIntent is a protocol in Swift that defines actions an app can perform, allowing interaction with system features like widgets and shortcuts.
struct ToggleMotivationIsFavoriteIntent: AppIntent {

    static var title: LocalizedStringResource = "Toggle Favorite Status"
    static var description = IntentDescription("Toggle favorite status for a motivation message")

    @Parameter(title: "Motivation")
    var motivation: MotivationEntity

    init(motivation: MotivationEntity) {
          self.motivation = motivation
      }

    init() {}

    func perform() async throws -> some IntentResult {

        let modelContext = ModelContext(SharedModelContainer.shared.container)
        let id = motivation.id

        // Find and update the motivation
        guard let motivation = try! modelContext.fetch(
            FetchDescriptor<Motivation>(
                predicate: #Predicate { $0.id == id }
            )).first else {
            return .result()
        }

        // Toggle favorite status
        motivation.isFavorite = !(motivation.isFavorite ?? false)

        // Save changes
        try? modelContext.save()

        // Refresh widget
        WidgetCenter.shared.reloadAllTimelines()

        return .result()

    }

}
⭐️ 13.3 Add a Star Toggle Button to the Widget
Now add a custom button view to trigger the intent:
struct ToggleFavoriteButton: View {
    let motivation: MotivationEntity

    var body: some View {
        Button(
            intent: ToggleMotivationIsFavoriteIntent(motivation: motivation)
        ) {
            Image(systemName: motivation.isFavorite ? "star.fill" : "star")
                .foregroundStyle(motivation.isFavorite ? .yellow : .gray)
                .contentTransition(.symbolEffect(.replace))
        }
        .buttonStyle(.plain)
    }

}
🎨 13.4 Integrate ToggleFavoriteButton Into the Widget View
Inside your ConfigurableWidgetEntryView, update the UI to conditionally show the star toggle if a motivation was selected:
if let motivation = entry.configuration.motivation {
    ToggleFavoriteButton(motivation: motivation)
}
This allows users to mark a message as a favorite directly from the widget by tapping the star — no app opening needed.
⭐️ Step 14: Add a Show/Hide Timestamp Toggle to Widget Configuration
Do you want to give users complete control over the widget’s appearance? If so, let’s add a new toggle in the configuration screen that allows users to choose whether to display or hide the timestamp.
🧱 14.1 Update the ConfigurationAppIntent
Open AppIntent.swift and update your ConfigurationAppIntent:
struct ConfigurationAppIntent: WidgetConfigurationIntent {
    static var title: LocalizedStringResource = "Choose Motivation"
    static var description = IntentDescription("Pick a motivation message to show in your widget.")

    @Parameter(title: "Motivation")
    var motivation: MotivationEntity?

    @Parameter(title: "Show Timestamp")
    var showTimestamp: Bool?
}
By adding showTimestamp, the user will now see a toggle when editing the widget.
🧠 14.2 Update the Widget Entry and View
Since SimpleEntry now includes the showTimestamp feature, you’re already passing configuration into it. Therefore, you need to update your view to respond accordingly.
In ConfigurableWidgetEntryView.swift, update this block:
if entry.configuration.showTimestamp ?? false {
    Text(entry.date, style: .time)
        .font(.caption2)
        .foregroundStyle(.gray)
}
This conditionally displays the timestamp only when showTimestamp is enabled.
🧪 14.3 Update Widget Previews
Update your sampleMotivation1 and sampleMotivation2 preview values to test this:
    /// Preview: Configuration with sample motivation 1
    fileprivate static var sampleMotivation1: ConfigurationAppIntent {
        let intent = ConfigurationAppIntent()
        intent.motivation = MotivationEntity(
            id: UUID().uuidString,
            message: "Push beyond limits.",
            isFavorite: true,
            backgroundColorHex: "#D3D3D3"
        )
        intent.showTimestamp = true
        return intent
    }
✅ App Groups are required for shared data widgets (e.g., SwiftData + AppIntent + AppEntity) — like the one we built.
✅ Your iPhone must be running iOS 14 or later (iOS 17+ recommended for best performance and widget interaction).
Want to support this SwiftUI learning journey or get the full commented source code for this Tutorial? Consider purchasing the complete example.
It includes:
SwiftData + WidgetKit integration
AppIntent + AppEntity patterns
Color + favorite + timestamp configuration
Related Posts


Comments (0)