
In this article, we will walk you through the process of setting up GitHub in…
Build Your First Widget in SwiftUI — A Guide with Source Code
Want to bring widgets to your SwiftUI app but not sure where to begin? This updated tutorial walks you through the entire process of creating a SwiftUI Widget using WidgetKit, complete with step-by-step guidance and working code. By the end, you’ll have a motivational widget that refreshes every 10 minutes with custom colors and messages.
🔗 Download the full commented source code (Xcode Project) for this Tutorial
🧰 Getting Started — Create a Fresh SwiftUI Project
Open Xcode and start a new app:
-
Go to File → New → Project → App
-
Name your project something like
WidgetApp -
Interface: SwiftUI
-
Language: Swift
Save the project and move on to the next step.
➕ Add the Widget Extension
Now it’s time to add a widget target:
-
File → New → Target
-
Select Widget Extension
-
Uncheck the options:
-
Live Activity
-
Control
-
Configuration App Intent
-
-
Name it something like
WidgetAppWidget -
Confirm and activate the new scheme if prompted.
🔍 Understand the Auto-Generated Files
Xcode will create two key files:
AppWidgetBundle.swift – Entry Point
This struct defines your widget bundle and serves as the extension’s entry:
import WidgetKit
import SwiftUI

@main
struct AppWidgetBundle: WidgetBundle {
    var body: some Widget {
        AppWidget()
    }
}-
The
@mainattribute designates this as the starting point of your widget extension. -
You can group multiple widgets into this bundle in future updates.
AppWidget.swift – The Core Widget File
This file contains everything your widget needs:
-
A data model (
SimpleEntry) -
A timeline provider
-
A view for the widget UI
-
The actual widget struct with configuration
-
A #Preview section to test in Xcode
📦 1. Define the Widget’s Data Model
The SimpleEntry struct represents the snapshot of data shown at each update:
struct SimpleEntry: TimelineEntry {
    let date: Date
    let emoji: String
}
-
date: Tells the system when to show this entry. -
emoji: Temporary example content — later, we’ll replace it with a message and background color.
🧠 2. Implement the TimelineProvider
The TimelineProvider tells WidgetKit what to display and when. It includes three main functions:
struct Provider: TimelineProvider {
   // 1️⃣ func placeholder(in context: Context) -> SimpleEntry { … }
   // 2️⃣ func getSnapshot(in context: Context, completion: @escaping (SimpleEntry) -> ()) { … }
   // 3️⃣ func getTimeline(in context: Context, completion: @escaping (Timeline<SimpleEntry>) -> ()) { … }
}
1️⃣ placeholder(in:)
Shows temporary content in the widget gallery.
func placeholder(in context: Context) -> SimpleEntry {
    SimpleEntry(date: Date(), emoji: "😀")
}
2️⃣ getSnapshot(in:)
Provides a static snapshot of data.
func getSnapshot(in context: Context, completion: @escaping (SimpleEntry) -> ()) {
    let entry = SimpleEntry(date: Date(), emoji: "😀")
    completion(entry)
}
3️⃣ getTimeline(in:)
Generates a list of timeline entries.
func getTimeline(in context: Context, completion: @escaping (Timeline<Entry>) -> ()) {
    var entries: [SimpleEntry] = []

    let currentDate = Date()
    for hourOffset in 0 ..< 5 {
        let entryDate = Calendar.current.date(byAdding: .hour, value: hourOffset, to: currentDate)!
        let entry = SimpleEntry(date: entryDate, emoji: "😀")
        entries.append(entry)
    }

    let timeline = Timeline(entries: entries, policy: .atEnd)
    completion(timeline)
}
🖼️ 3. Create the Widget UI with SwiftUI
Use SwiftUI to define how your widget appears on the home screen.
struct AppWidgetEntryView : View {
    var entry: Provider.Entry

    var body: some View {
        VStack {
            Text("Time:")
            Text(entry.date, style: .time)
            Text("Emoji:")
            Text(entry.emoji)
        }
    }
}
🧱 4. Configure the Widget Structure
This section ties everything together and registers the widget with iOS.
struct AppWidget: Widget {
    let kind: String = "AppWidget"

    var body: some WidgetConfiguration {
        StaticConfiguration(kind: kind, provider: Provider()) { entry in
            if #available(iOS 17.0, *) {
                AppWidgetEntryView(entry: entry)
                    .containerBackground(.fill.tertiary, for: .widget)
            } else {
                AppWidgetEntryView(entry: entry)
                    .padding()
                    .background()
            }
        }
        .configurationDisplayName("My Widget")
        .description("This is an example widget.")
    }
}
👀 5. Previewing Your Widget
SwiftUI’s new #Preview lets you simulate the widget in Xcode.
#Preview(as: .systemSmall) {
    AppWidget()
} timeline: {
    SimpleEntry(date: .now, emoji: "😀")
    SimpleEntry(date: .now, emoji: "🤩")
}
🎯 Make It Useful — Show Random Motivational Quotes
Let’s make this widget more inspiring.
Instead of an emoji, we’ll show motivational quotes every 10 minutes and change background colors.
🛠 Update SimpleEntry
struct SimpleEntry: TimelineEntry {
    let date: Date
    let message: String
    let color: Color
}
🧠 Update Provider
Add sample messages and colors:
let messages = [
    "Keep going 💪", "You're doing great!", "Just one more step 🚶",
    "Stay focused 🎯", "You’ve got this 🔥", "Make it count 💥",
    "Smile, breathe, move 🌿", "Every moment matters ⏳"
]

let backgroundColors: [Color] = [
    .blue, .green, .orange, .pink, .purple, .yellow, .teal, .mint
]

let defaultColor: Color = .gray
let defaultMessage = "Keep going 💪"
Update placeholder and getSnapshot:
func placeholder(in context: Context) -> SimpleEntry {
    SimpleEntry(date: Date(), message: defaultMessage, color: defaultColor)
}

func getSnapshot(in context: Context, completion: @escaping (SimpleEntry) -> ()) {
    let entry = SimpleEntry(date: Date(), message: defaultMessage, color: defaultColor)
    completion(entry)
}
Update getTimeline:
func getTimeline(in context: Context, completion: @escaping (Timeline<Entry>) -> ()) {
    var entries: [SimpleEntry] = []
    let currentDate = Date()

    for minuteOffset in 0 ..< 6 {
        let entryDate = Calendar.current.date(byAdding: .minute, value: minuteOffset * 10, to: currentDate)!
        let message = messages.randomElement() ?? defaultMessage
        let backgroundColor = backgroundColors.randomElement() ?? defaultColor
        let entry = SimpleEntry(date: entryDate, message: message, color: backgroundColor)
        entries.append(entry)
    }

    let timeline = Timeline(entries: entries, policy: .atEnd)
    completion(timeline)
}
🎨 Redesign the Widget View
struct AppWidgetEntryView : View {
    var entry: Provider.Entry

    var body: some View {
        ZStack {
            VStack(spacing: 10) {
                Text(entry.message)
                    .font(.headline)
                    .multilineTextAlignment(.center)
                    .minimumScaleFactor(0.5)
                    .lineLimit(1)
                    .foregroundStyle(.primary)

                Text(entry.date, style: .time)
                    .font(.caption)
                    .foregroundStyle(.secondary)
            }
        }
    }
}
⚙️ Update Widget Config
struct AppWidget: Widget {
    let kind: String = "AppWidget"

    var body: some WidgetConfiguration {
        StaticConfiguration(kind: kind, provider: Provider()) { entry in
            let backgroundColor = entry.color.opacity(0.25)

            if #available(iOS 17.0, *) {
                AppWidgetEntryView(entry: entry)
                    .containerBackground(backgroundColor, for: .widget)
            } else {
                AppWidgetEntryView(entry: entry)
                    .padding()
                    .background(backgroundColor)
            }
        }
        .configurationDisplayName("Motivational Widget")
        .description("This Widget Will Keep You Motivated")
    }
}
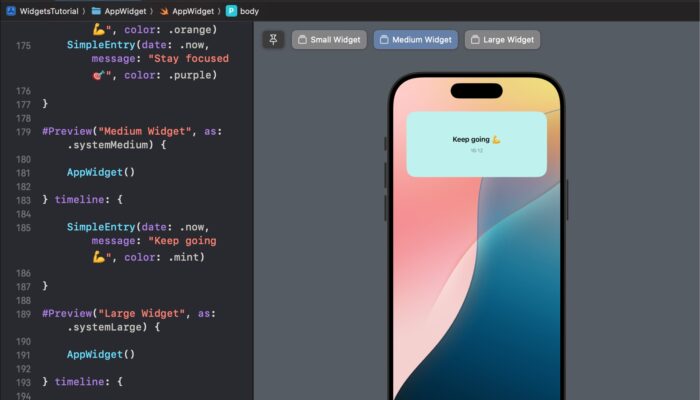
🧪 Preview It
#Preview("Small Widget", as: .systemSmall) {
    AppWidget()
} timeline: {
    SimpleEntry(date: .now, message: "Keep going 💪", color: .orange)
    SimpleEntry(date: .now, message: "Stay focused 🎯", color: .purple)
}
📱 Test on a Real Device
-
Run your main app target on a real device.
-
Long-press the Home Screen → Tap “+” → Search for your widget → Add.
-
Optionally tap and edit the widget for configuration.
Note: App Groups aren’t required if your widget shows static or internal data only.
✅ Final Notes
-
Code is tested on Xcode 16.2 and iOS 18.2 (as of June 2025)
-
Always check compatibility with newer Xcode versions
-
If you run into issues, let us know via comments
DOWNLOAD SOURCE CODE FOR THIS TUTORIAL
Related Posts


Comments (0)