A New Chapter for Apple Developers Apple’s WWDC 2025 wasn’t just about new products—it was…
Learn how to work with Xcode Previews in SwiftData App

Learn how to work with Xcode Previews in SwiftData App. SwiftData in combination with SwiftUI allows you to quickly prototype and develop apps by providing easy-to-use, in-memory storage for model data. In this tutorial, we’ll walk through how to create sample recipe data using ModelContainer and display that data in SwiftUI views with previews.
Step 1: Defining the Recipe Model
Setup a Recipe model that represents a dish with a name, cooking time, and ingredients.
import Foundation
import SwiftData

@Model
class Recipe {

    @Attribute(.unique) var id: UUID
    var name: String?
    var cookingTime: Int // in minutes
    var ingredients: [String]

    init(id: UUID = UUID(), name: String? = nil, cookingTime: Int, ingredients: [String]) {
        self.id = id
        self.name = name
        self.cookingTime = cookingTime
        self.ingredients = ingredients
    }
}
This model defines each recipe with a unique ID, name, cooking time, and a list of ingredients. With this setup, you can now store recipes in SwiftData and use them in your app.
Step 2: Creating Sample Data for Previews
Now, let’s generate sample data using ModelContainer. You’ve written a method to insert sample recipes into a ModelContainer for use in previews.
import Foundation
import SwiftData

let sampleRecipes = [
    Recipe(name: "Spaghetti Bolognese", cookingTime: 45, ingredients: ["Spaghetti", "Minced Beef", "Tomato Sauce"]),
    Recipe(name: "Grilled Cheese Sandwich", cookingTime: 10, ingredients: ["Bread", "Cheese", "Butter"]),
    Recipe(name: "Beef Wellington", cookingTime: 120, ingredients: ["Beef Tenderloin", "Puff Pastry", "Mushrooms", "Dijon Mustard"])
]

extension Recipe {
    @MainActor static func makeSampleRecipes(in container: ModelContainer) {

        let context = container.mainContext

        // Check if there are any existing recipes in the database
           let existingRecipesCount = (try? context.fetch(FetchDescriptor()))?.count ?? 0
           guard existingRecipesCount == 0 else {
               // If there are existing recipes, do not create new ones
               return
           }

           // Sample data to create
           let recipes = [
               Recipe(name: "Spaghetti Bolognese", cookingTime: 45, ingredients: ["Spaghetti", "Minced Beef", "Tomato Sauce"]),
               Recipe(name: "Grilled Cheese Sandwich", cookingTime: 10, ingredients: ["Bread", "Cheese", "Butter"]),
               Recipe(name: "Beef Wellington", cookingTime: 120, ingredients: ["Beef Tenderloin", "Puff Pastry", "Mushrooms", "Dijon Mustard"])
           ]

           // Insert the sample recipes into the context
           for recipe in recipes {
               context.insert(recipe)
           }

           // Save the context to persist the new data
           try? context.save()

    }
}
This method defines three recipes and inserts them into the ModelContainer. The @MainActor annotation ensures this method runs on the main thread, which is essential for interacting with SwiftData.
Step 3: Implementing the RecipeSampleData for Previews
The RecipeSampleData structure serves as a PreviewModifier to create in-memory sample data. This makes it easy to display recipes in SwiftUI previews.
import SwiftUI
import SwiftData

struct RecipeSampleData: PreviewModifier {
    static func makeSharedContext() throws -> ModelContainer {
        let config = ModelConfiguration(isStoredInMemoryOnly: true)
        let container = try ModelContainer(for: Recipe.self, configurations: config)
        Recipe.makeSampleRecipes(in: container) // Load sample recipes
        return container
    }

    func body(content: Content, context: ModelContainer) -> some View {
        content.modelContainer(context)
    }
}

extension PreviewTrait where T == Preview.ViewTraits {
    @MainActor static var sampleRecipeData: Self = .modifier(RecipeSampleData())
}
This modifier creates a ModelContainer configured for in-memory storage. The makeSampleRecipes method loads sample recipes into the container, and the modifier applies this data to any view using the .modelContainer() modifier.
Step 4: Creating Recipe Views with Sample Data
Now let’s integrate this sample data into a few SwiftUI views.
Recipe List View
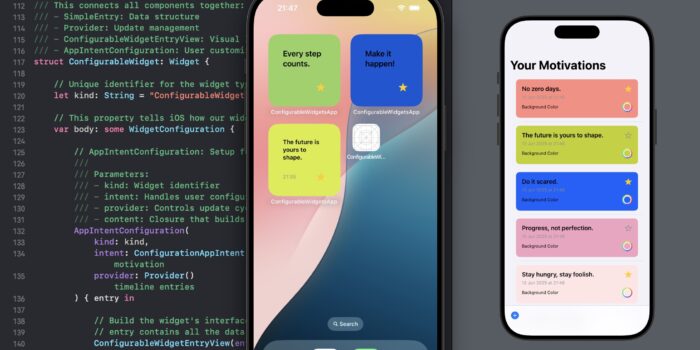
The RecipeListView displays a list of recipes loaded from SwiftData. The @Query property wrapper retrieves the recipes, and the list is built dynamically.
import SwiftUI
import SwiftData

struct RecipeListView: View {
    @Query private var recipies: [Recipe]
    @Environment(\.modelContext) private var context

    var body: some View {

        List {
            ForEach(recipies) { recipe in

                VStack(alignment: .leading) {
                    Text(recipe.name ?? "")
                           .font(.headline)
                       Text("Cooking Time: \(recipe.cookingTime) mins")
                           .font(.subheadline)
                   }
            }
        } .task {

               Recipe.makeSampleRecipes(in: context.container)
        }
    }
}

#Preview(traits: .sampleRecipeData) {
    RecipeListView()
}
In this example, the @Query property wrapper retrieves all Recipe objects from the ModelContainer, which are then displayed in a List using SwiftUI. The preview uses .sampleRecipeData to load in-memory recipes for testing the UI.
Recipe Detail View
For more detailed recipe information, the RecipeDetailView displays the name, cooking time, and ingredients of a single recipe. This view doesn’t query for data but accepts a Recipe object as a parameter.
import SwiftUI
import SwiftData

struct RecipeDetailView: View {
    let recipe: Recipe

    var body: some View {
        VStack(alignment: .leading, spacing: 10) {
            Text(recipe.name ?? "No Name")
                .font(.largeTitle)
            Text("Cooking Time: \(recipe.cookingTime) mins")
                .padding(.bottom)
            Text("Ingredients:")
            ForEach(recipe.ingredients, id: \.self) { ingredient in
                Text(ingredient)
            }
        }
        .padding()
    }
}

#Preview(traits: .sampleRecipeData) {
    @Previewable @Query var recipes: [Recipe]  // Query sample recipes
    RecipeDetailView(recipe: recipes.first!)
}
In this view, the recipe’s details are displayed, including the name, cooking time, and ingredients. The preview fetches the first recipe from the sample data.
Step 5
Now let’s connect our ListView with a DetailView using a NavigationLink inside a NavigationStack
import SwiftUI
import SwiftData

struct RecipeListView: View {
    @Query private var recipies: [Recipe]
    @Environment(\.modelContext) private var context

    var body: some View {

        NavigationStack {
            List {
                ForEach(recipies) { recipe in
                    NavigationLink(destination: RecipeDetailView(recipe: recipe)) {

                        // Recipe Row
                        VStack(alignment: .leading) {
                            Text(recipe.name ?? "")
                                .font(.headline)
                            Text("Cooking Time: \(recipe.cookingTime) mins")
                                .font(.subheadline)
                        }
                    }
                }
            } .task {

                Recipe.makeSampleRecipes(in: context.container)

            }
        }
    }
}

#Preview(traits: .sampleRecipeData) {
    RecipeListView()
}
Key Differences Between Preview and @Previewable
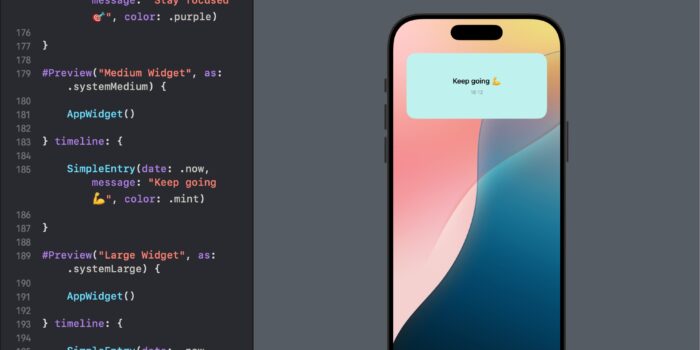
Previewwith Traits (.sampleRecipeData):- Best for views that query data using SwiftData.
- Automatically loads sample data into the view’s query and binds it to the UI.
- No need to manually pass data; the query handles it for you.
@Previewable:- Best for views that rely on models passed in as parameters (e.g., detail views).
- Allows you to create sample data and pass it directly to the view.
- You have full control over what specific data is provided for the preview.
Conclusion
By using SampleData and the @Previewable macro, you can easily preview recipe data within your SwiftUI views. Whether you’re working with data that relies on queries or views that require individual models, SwiftData provides an efficient way to prototype and test your app in Xcode.
Related Posts